|
MIDIBox 64 : Soldering pots and buttons 납땜하기 pots & buttons | ||
|
Mounting is to mount them to the panel first. 가장쉬운 방법 to 납땜을위한 은 to 마운트하는것이다. 그것들을 to the 패널에 우선. This way you can measure exactly how long the wires need to be, and besides, soldering all them pots and buttons and then mounting them can be quite a hassle, believe me. 그 방법 네가 측정할수있는 정확히 얼마의 길이를 그 와이어들이 필요로하는지 그리고 게다가 어떻게 납땜할지 그모든 pots & buttons를 그리고 나서 어떻게 마운트할지 그것들을 은 될수있다. 꽤나 a 귀찮은 상황, Just be careful not to touch any of the wires with the soldering iron as this will damage the wires and also produce a strange, but yet intriguing, smell. 그저 주의해라 not to 닿지않도록 any of the 와이어들에 with the 납땜 인두에 as 이게 데미지를입일것이다. 와이어들에 and 또한 만들어낼것이다. a 이상현상을, | ||
|
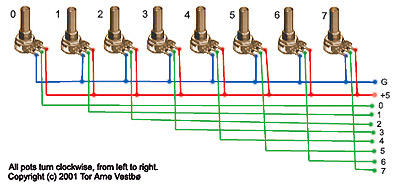
The pots Each pot has 3 contact points.
One should be connected to +5V, one to ground and the last one to the respective IC. (다리 3개중 2개는 +5V, GND에 연결이 되고 나머지 하나는 각 IC에 연결이 된다.) Most pots work in a way that when you turn the pot all the way to the left (anticlockwise) you turn it against the pin that should be connected to ground.
When you turn it all the way to the right (clockwise) you turn it against the pin that should be connected to +5V.
Between these two pins is the pin that goes to the IC.
☆ The pots can share the grounding and the +5V (connected in parallel) , but not more than 8 pots at a time or else the last pot won't get the same voltage as the first. Now bundle 8 and 8 pots like one the picture below. 팟들은 공유할수있다. GND와 +5V를 but not more than 8개이상은 안된다. 동시에 or 다른 마지막 pot won't 얻지못할것이다. 같은 전압을 at the 처음에. 이제 묶어라. 8개의 팟들을 like 하나로 아래의 사진같이
no more than 8 pots in a bundle. This way, when you turn a pot, it will send out a controller-value from 0 to 127, not from 127 to 0. Although if the opposite happens than just switch the ground and the +5V wire and you'll be fine. 비록 if the 반대가 발생할지라도 (☜ from 127 → 0) 그땐 그냥 바꿔라. the GND와 the +5V와이어를, 괜찮아질꺼다. If for some reason you start measuring the pots with your multimeter and discover that when your pots are connected they no longer go from 0W to 10KW, but from 0W to ca 3KW and then to about 1,25KW this has a simple explanation.
There are 8 pots, all at 10KW. Divide these two numbers and you can see a pattern. Just relax, the PIC will compensate for this change in W. PIC는 상쇄시킬것이다. for 이런 변화들을 in 저항에 있어서 Everything is the way it's supposed to be! Remember that there is one single pot for the LCD which has it's own connection point on the PCB so don't include this with the other pots. 기억해라. that을 하나의 싱글 pot이 있다. for LCD를 위한 which 갖고있는 그자체의 연결 포인틀ㄹ on the PCB상에 so 포함시키지말아라. 이걸 with the 다른 팟들과.
Thorsten advices that in order to reduce signal noise, you should wire the ground and +5V cables in a "starlike" fashion. The chassis should also be connected to ground. 섀시 또한 연결되야한다. to GND에. (chassis또한 금속이므로)
| ||
|
The buttons Buttons come in many different variations. We want the ones who doesn't stay in when pushed, but returns back out, ready for another push.
They also come with various number of pins, but just put your multimeter on "beeper" and find two pins that are silent when the button is not pushed and beeps when pushed. 찾아라. 두개의 핀들을 that are 조용한 when the 버튼이 눌리지않았을때 & 삐~! 소리를 내는 when 눌렸을때. (버튼의 다리중 동작하는 다리를 찾기위해선 Multimeter의 Beep기능을 이용해야한다.) (In order to find which legs of button work well, you should use "Beep" function on Multimeter)
There you have your two pins. The connection works just like on the pots, apart from that there is no voltage input. Just one ground pin and a "send"-pin that goes to the IC. Select one of the pins to be ground and be consequent about it. Hook all the ground pins together and end in one wire like with the pots. Then solder a wire to each "send"-pin and bundle like with the pots (8 in a bundle). |

'MiDi' 카테고리의 다른 글
| Step10-2.RS232통신과 MicroController와의 연결도 (0) | 2012.12.09 |
|---|

